Table of Contents |
FAQQuestion:
Why can't I delete certain accounts in the Web User Administrations
section? |
Introduction
Open 79XX XML Directory is an application designed to fully utilize the display features on Cisco 79XX IP Phones. It includes on-screen phone directories, search capabilities, text memos, interactive user status, and more. The XML directory is accessed by pressing the Services button on the phone set.Web User Interface
The web user interface allows users to modify data for display on the phone screens. For security purposes, a username and password is required, and accounts can be created for administrative and non-administrative roles.
Display Items
The items on the left side of the menu are used to create and the links, contact holders, contacts and memos that are be displayed on your Cisco XML 79XX phone.
Preview AllSelecting preview all will display all of the objects in the directory. It will show where they are in a tree diagram fashion.
In the upper right hand corner of the page is a print button. Clicking this will bring you to a printer friendly version of the tree diagram.
Clicking on an object will bring you to the edit page for that object.
Objects
Upon selecting the link Objects, you will be presented with two dropdown menus, a search button, and an add button. To view all of the objects in the directory, click the search button. To view objects in a specific container use the dropdown menu labeled 'View Objects in Container'. You can further specify your search by selecting the drop down next to 'and object type is'. This will limit the search to a specific object type.
There are three different object types and you have the ability to add, create, edit and delete them.
Container - A container holds objects. Objects can include other containers, links to external services, and phone contact holders. (A container can be thought of as a folder, as your would see if you were browsing your hard drive. )
Resources is a container, and is holding to links, but could also hold another container or a Contact Holder.
Contact Holder - A Phone Contact Holder holds contacts. A Contact Holder must be within a container, and is only able to hold contacts. Link - A link may be used to connect to other XML resources and must be within a container. An example of a use for this would be connecting to a weather service, news feed, or other off-site resource. Upon pushing the search button, all of the objects in the directory that match your search criteria will be displayed.
There will be 4 columns.
- Title - The text that will be displayed on the phone to represent the object.
- Type - The type of object, ('Container', 'Contact Holder', or 'Link').
- Access - The Access level for this object
- Style - How the contact details will be displayed.
Unified as a compreensive agenda or
Simplified with all details of all contact presented on a simple list.- Edit/Delete - Clicking edit will direct you to the edit object page. Clicking delete will delete this object from the database.
Clicking the 'Add' button will bring you to the 'Edit Object' screen where you can select what type of object you would like to create. Clicking the 'Create' button will bring you to the 'Edit Object' screen.
Preview - The preview button will where the object is in the Preview All screen. This will give you a better idea of where in the directory this object is.
Editing Container -
Information collected when creating/editing a container...
- Title - Enter text you would like to be displayed on the phone for this object
- Member
Of - This is the container that you would like the
object to be in. ('Main' is the root container)
Access - Choose the Access level for this object. - Title - Text you would like to be displayed on phone for this object
- Member Of - This is the container that you would like the object to be in. (Main is the root container)
- Access - Access level for this object.
- Style
- Unified - Contact names will be displayed in the Contact Holder. Once the contact is selected, the phone numbers belonging to the contact are shown. Now a number belonging to the contact is chosen to be dialed. (Office, Home, Cell, or Other). (see images below)
- Simplified - Contact names and numbers will be displayed in Contact Holder. The Contact is dialed directly from the list. (see images below)
Editing Contact Holder -
Information collected when creating/editing a Contact Holder...
| Unified | 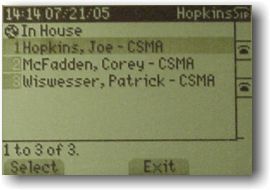 |
 |
| Select Contact. | Select Specific Phone to Dial | |
| Simplified | 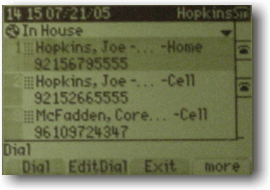 |
|
| Select Contact/Specific Phone to Dial | ||
Editing Link -
Information collected when creating/editing a link...
- Title - Text you would like to be displayed on phone for this object
- Member Of - This is the container that you would like the object to be in. (Main is the root container)
- Link - URL used to find link resource when selected by the phone.
- Access - Access level for this object.
Upon selecting the Contacts' link you will be presented with the text 'View Contacts in Contact Holder' along side a dropdown menu. This dropdown menu specifies what Contact Holder to show contacts from. Selecting a Contact Holder, then hitting search, will bring up only the contacts within that Contact Holder.
There will be 4 columns in the results of your search.
- Last, First or First Last Name - The first and last name of the specific contact. This will be the information displayed on the phone to represent this contact and will follow the global preferences.
- Company - The company the contact belongs to. This information will be displayed along side the title, when viewing the contact using the phone interface.
- Title - The title will be displayed along side the name of the contact, and company if applicable, in the phone interface. e.g.: CIO, CFO, Boss, Mom, Dad
- Edit/Delete - Clicking edit will direct you to the contact editing page. Clicking delete will delete this contact from the database.
Click the add button to add a contact to the directory and bring you to the 'Edit Contact' page.
Edit Contact -
Information collected when creating/editing a contact...
- Owner - The username of the person who created this contact.
- Member Of - Contact Holder that contact is contained in.
- First Name - The first name of the contact.
- Last Name - The last name of the contact.
- Company - The company the contact belongs to. This information will be displayed along side the title, when viewing the contact using the phone interface.
- Title - Text you would like to be displayed along side the name of the contact.
- Phone Numbers - Each contact holds 4 phone numbers.
- Office Phone
- Home Phone
- Cell Phone
- Other Phone
Upon selecting memos, you will be shown a 5 column table containing all of the saved memos.
(A memo is a text message that will be displayed under the memos section on all of the Cisco XML 79XX phones in the directory.)
There is a 5 column table on the Memos screen.
- Title - Text that will be displayed on the phone to represent the memo.
- Sender - The username of the person who posted this memo.
- Date - The date and time that the memo was posted.
- Edit/Delete - Clicking edit will direct you to the memo editing page. Clicking delete will delete this memo from the database.
Edit Memo -
Information collected when creating/editing a memo...
- Title - Text that will be displayed on the phone to represent the memo in the list of memos
- Message - Text that will be displayed in the body of the memo.
- Sender - The username of the person who posted this memo.
- Company - The Access level of this memo.
The Phone Registrations page will show you a list of all of the phones that have been registered. Phones are registered by their MAC address.
The page will also show you the phones that have attempted to enter the directory that are not registered. These phones will be labeled as 'Unkown'.
There is a 4 column table on the Memos screen.
- MAC Address - Mac address (physical address) of the phone.
- Access Level - The Access level of the phone, either public or private.
- Last,First or First Last Name - The name of the person who uses the phone following the global preferences.
- Number - The extension of the phone.
- IP Address - The last seen IP Address of the device. Note that if this system is on Internet, you will see only the Natted IP Address, which is valuable for roaming users.
- UserID - The username used for push features.
Edit Phone Registrations -
Information collected when adding/editing a phone...
- MAC Address - Mac address (physical address) of the phone.
- First Name - First name of the phone user, this will be displayed when users view your status.
- Last Name - Last name of the phone user, this will be displayed when users view your status.
- Number - This is the extension of the phone. Numbers assigned to phones are not affected by the Global Preferences prefix setting.
- Access Level - The Access level of the phone, either public or private.
- UserID and Password - Credentials to be used with push features.
- Idle Logo - What to display when phone is idle.
Administration Tools
Accounts opted as admin have special privileges.
The 'Web User Administration' and 'Global Preferences' can only be accessed by admin's.Web User Administration
Upon selecting Web User Administration, you will be shown a 4 column table containing all of the user accounts.
- Username - User's login name for this web interface
- Email - User's email address
- Account Type - Assigns Account privileges for this user web login.
- Admin - Has access to all parts of the web interface. 'Admin' features include, the 'Web User Administration', and 'Global Preferences'.
- User - Has limited privileges. 'Access to Web User Administration' and 'Global Preferences' is denied.
- Edit/Delete - Clicking edit will direct you to the Edit User page. Clicking delete will delete this user from the database.
Add User -
Information collected when adding web user information:
- Username - User's login name for this web interface
- Assign Password - Desired password for user login
- Repeat Password - Repeat the password for assurance that is has been typed correctly
- Email - User's email address. Required only for Admins so we can alert them.
- Account Type - Assigns Account privileges for this web login.
- Admin - Account has access to all parts of web interface. Admin features include, the Web User Administration, and Global Preferences.
- User - Account has limited
Edit User -
Information collected when editing web user information...
- Username - User's login name for this web interface
- Assign Password and Repeat Password - Change both field only if you need to change user's password
- Email - User's email address. Again, required only for Admins.
- Account Type - Only an admin can change other's Account privileges.
Global Preferences
Upon selecting Global Preferences you will be displayed a screen with different options available for the directory. These preferences affect the whole directory and should be chosen carefully.
- Enable Phone Security -
- If this option is checked, all phones will need to be registered in order to access the directory. If an unregistered phone (a phone that has not been added to the Phone Registrations page using its MAC address) attempts to view the directory, it will be shown an accessed denied screen. The phone will also display its MAC address at the bottom of the screen, this is entire address needs to be added to the Phone Registrations page.
- If this option is not checked, unregistered phones (a phone that has not been added to the Phone Registrations page using its MAC address) will have access to objects at the public Access level, but access to the private objects will depend on the Enable Object Security Preference.
- Enable Object Security -
- If this option is checked, a phone's access to public or private objects will depend on its Access level. A phone registered as Unrestricted Access Level will have access to Public and Private objects. A phone registered as Restricted Access Level will only have access to Public objects.
- Access level - Ranked either public or private. Access levels are assigned to all objects as a security measure.
- If this option is not checked, a registered phone will have access to Public and Private objects regardless of its Access level being Restricted or Unregistered
- Enable Prefix -
- If this option is checked, the custom prefix will be attached to the front of contact numbers called.
- Example, the prefix is 9. if the contacts number was 2155597788 when someone dials that contact, the dialed number will be 92155597788. Prefixes are not used when dialing someone via the User Status section of the XML Directory because these numbers are usually extensions, not outside calls.
- If this option is not checked, the custom prefix will not be attached to numbers.
- Enable Auto search on Objects and Contacts menus -
- If this option is checked, it enables accessing Objects and Contacts data in a more fast way by auto searching on each menu.
Uncheck this option if experiencing long response times with large number of records. WebUI only.- List names as -
- Allows choose how names are listed and sorted, as Last, First name or First Last name.
- Order Memos By -
This adjusts the default order of memos when viewing them on the phone interface or on the web interface.
- by Date - Memos will be ordered in reverse chronological order. (Newest memos shown first)
- by Sender - Memos will be ordered alphabetically based on who posted the memo.
- by Title - Memos will be ordered alphabetically based on the title
Phone User Interface
The Phone User Interface is designed for Cisco 79XX phones. These phones receive information from the directory and display the menus using XML.
Getting Started
The directory can be accessed on your phone by pressing the Services button which is often is labeled with a globe icon. (See Image A). You will then be logged into the directory. (See Image B)
Image A
Image B
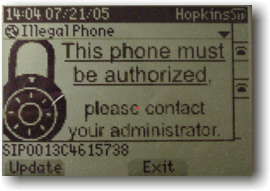
Image CIf your phone is not yet registered, a security screen may (depending on the Global Preferences) prompt you to register your phone. (See Image C) See Phone Registrations. Once your phone has been registered you will have access to the directory. Your access to objects will depend on your Access level and the Global Preferences.

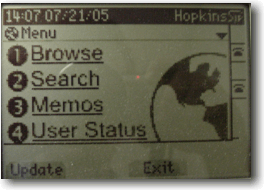
Main Menu
There is a menu with four options that will be displayed once your phone logs into the directory
- Browse
- Search
- Memos
- User Status
To access one of these sections press the corresponding number on your keypad.
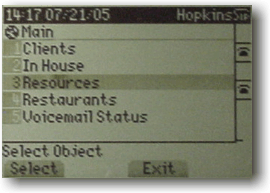
Browse
The Browse section is used for for finding contacts and links by browsing through different containers and contact holders.
The first screen will show all of the objects in the container main. To select an object, you can press the number on the keypad that corresponds to the one on the screen, or select it with the arrow keys and then press the select button.
If the object you select is a...
Container, then you will be shown all of the objects inside of that container. Instead of being in container 'Main' you will now be in the container you have selected and shown the objects inside.
Contact Holder, then you will be shown all of the contacts belonging to it.
Link, then you will be redirected to another XML application or directory depending on what the address of the link is.
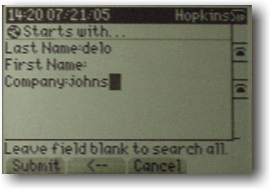
Search
The search section is used for finding contacts by having the phone search for you, depending on what the last name, first name, and or company that you opt to see.. (This can be quicker than using the browse screen, especially if the container and or Contact Holder of the contact is unknown, or if the contact is in Contact Holder that contains a large number of contacts.)
The first screen prompts you to choose a type of search.
- Global Search - Will search the whole directory.
- Contact Holder Search - Will prompt you to choose a Contact Holder to search in.
Once you have chosen the type of search, (if you chose Contact Holder Search, then you need to select which Contact Holder you would like the search to be limited to) the fields, "Last Name", "First Name", and "Company" will be displayed. You can enter information in all three of these fields if you would like. Enter in the full names, or just what they start with. A field left blank will search all for that field.
Ex.
The phone will find all contacts that the Last Name starts with Delo and Company starts with Johns, regardless of the First Name.
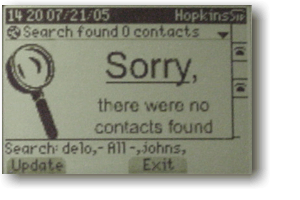
After pressing submit. The list of contacts that match your search will be shown. Selecting a contact will show the contact's phone numbers. Select a Phone number to dial that contact.
If no contacts match your search, make sure that you have typed in the information correctly. If there are still no results try "broadening your search" by only searching for the last name, first name, or company. Because not all information may have been entered when the contact was created. If there are still no results, use your web login and go to the contacts section. Make sure that the contact you were trying to search for is listed and has the correct information identified.
Memos
This section allows messages to be posted to the phones and read. Messages are created using the Memos section of the Web User Interface. A phones ability to view the memos is dependent on its Access level . A memo is treated just like an object regarding its public or private security level.
Selecting Memos on the phone will bring up a list of the current memos. The initial order of the memos is dependent on the Global Preferences settings. The default setting orders the memos newest to oldest, so the memos that have been created most recently will be shown at the top of the list. You can customize the order in which to read the current memos on your screen by going to the bottom of the list and selecting one of the three "Order By:" options.
Select a memo from the list to view it. At the bottom of the opened memo screen will be a note that says "By: ...." this is where the creator of the memo (the username of the person using the Web Interface) is displayed along with the date and time of the creation/last change made to the memo.
User Status
This section allows you to select a status and message to display to everyone in the directory.
You can also view the status of other people.Show All Users
To view the status of others, select Show All Users. You will then be shown 3 options.
- Show All - View all users.
- Available - View only available users.
- Unavailable - View only unavailable users.
The number in the parenthesis is the number of users that fall under that description.
Ex. "Available (14)" There are 14 users that have their status set to Available.Once you choose an option there will be a screen with the list of those users.
{screen shot here}
The number in the parenthesis is the extension number for the phone that the person is using. If there is a * next to the extension it means they have a special message they would like everyone to see.
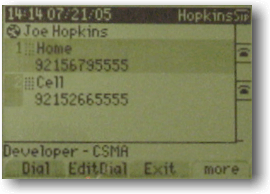
For Example see Image A.
His name is Joe Hopkins, phone extension is 566, and the * indicates that he has a message to display.
Image A
Image B
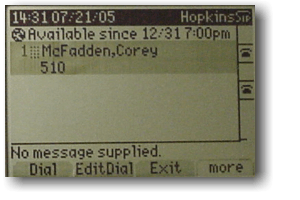
Selecting a user will display all of the information regarding their status. The top of the screen will show the date and time that the user selected their status. See Image B. Below that will be their username and extension, which when selected will dial that user's extension. The bottom of the screen will display the status message that the user has selected.
My Status
This screen will show your status at the top. Below that, next to the number 1, your status message is shown. This is the message that users will see when they view your status. Selecting the message will bring you to the Change My Status screen. Selecting "Back to Main Menu" will direct you to the main menu of the Phone User Interface.
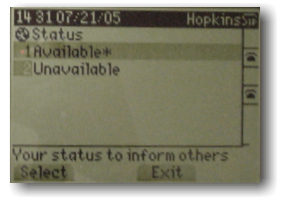
Change My Status
This screen will prompt you to select your status to be either "Available" or "Unavailable". A * next one of these options is a note indicating that your status is currently set to that option.
In this example, the current status is set to Available Once you select a status, you will be prompted to select a message to go with your status. Selecting the first option "No Message" will set your status and label you as not having a message to show. Selecting "Custom Message" will allow you to type in a custom message using the keypad.
Once you have selected your message you will be shown your status and the option "Back to Main Menu" to go directly back to the main menu.